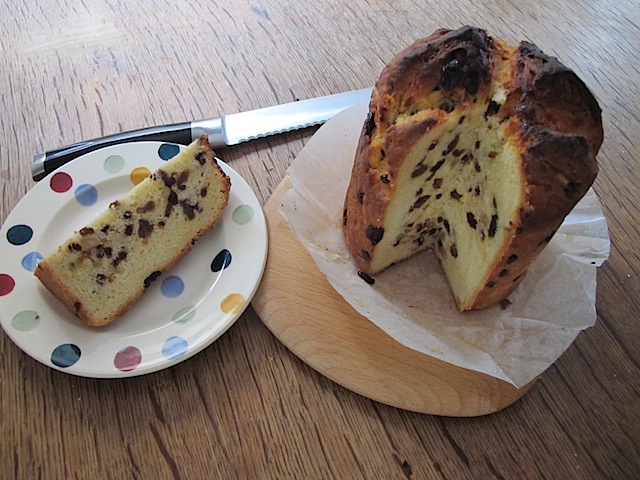
Baking a panettone recipe in the middle of October felt a bit strange but I was practising early!

Panettone is a traditional Italian Christmas bake, a bready, eggy, buttery, fruity dome usually sold in a pretty cardboard box. My Florentine housemates introduced me to panettone in the late nineties; sliced and sprinkled with icing sugar they toasted it under the grill. I’ve also eaten panettone as eggy bread and even made stuffing from it (minus choc chips!). But until now I’d never found an easy panettone recipe.
My quest for an easy panettone recipe
Surprisingly I struggled to find a panettone recipe at all in my 100+ cookery book collection.
Delia had used premade ones for bread and butter pudding, Nigella hadn’t done it at all, Rachel Allen’s Bake didn’t feature it and even the new Paul Hollywood bread book missed it out.
Panettone you can make in your sleep
Doing a bit here, a bit there, I baked my easy panettone 22 hours after starting it.

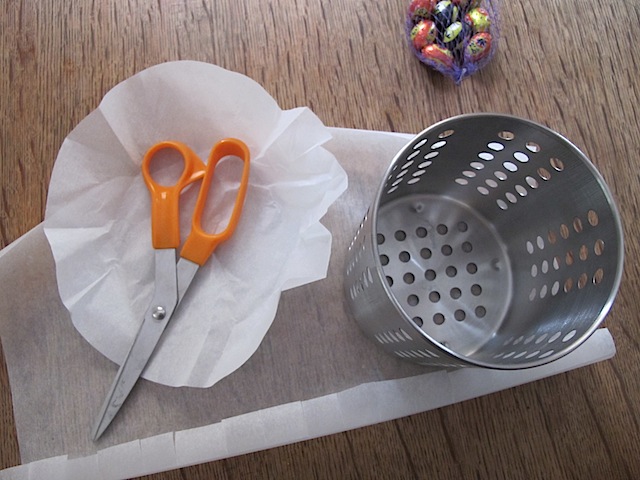
Improvise your own panettone mould
Since so few people will own a panettone mould I improvised with a (new) £2 IKEA cutlery drainer. Alternatives are giant plum peeled tomato tins.
Easy panettone recipe that practically bakes itself
Ingredients
- 7 g sachet dried yeast
- 400 g strong white bread flour
- 75 g caster sugar (superfine baking sugar)
- 2 large free range eggs plus 2 egg yolks at room temperature
- 3 tbsp lukewarm water
- half teaspoon vanilla extract
- finely grated zest of one unwaxed orange and one unwaxed lemon
- half teaspoon salt
- 175 g softened unsalted butter
- 75 g sultanas I made up the weight with raisins too
- 50 g candied orange diced or finely chopped
- 50 g dark chocolate chips or more fruit
- 40 g unsalted butter to finish
Instructions
- Mix 125g of the weighed flour with the yeast and sugar in a large mixing bowl or the bowl of an electric mixer and make a well in the centre. Mix the two whole eggs with the water and pour into the well.
- Using your hands or a dough hook, mix the flour into the liquid to make a smooth thick batter. Sprinkled a little of the remaining weighed flour over the top of the batter to prevent a skin forming then leave in a warm place for around an hour or until the batter is very bubbly. (Mine expanded but didn't go bubbly. It was fine).
- Stir in the egg yolks, vanilla and grated zest using your hand or dough hook. Gradually work in 175g flour plus the salt to make a soft sticky dough.
- Next add the softened butter and work in with your fingers or the dough hook on a slow speed. Beat until the butter is incorporated with no streaks.
- Turn out the dough onto a floured surface and knead thoroughly by hand for ten minutes (or use the dough hook for 3-4 minutes) working in the remainder of the weighed flour to make a satiny soft pliable non-sticky dough. Depending on the flour, you may not need it all or you may need a little more. (Mine was fine).
- Cover the bowl with cling film (I used a tea towel as well, mainly because it feels "rustic") and leave to rise at room temperature until doubled in size, probably 2 to 2.5 hours. Don't leave in a very warm place as the butter will melt.
- Next uncover the dough and punch down to deflate. Cover again and let it double in size again (1 to 1.5 hours although I left mine 2 whilst we had Sunday lunch).
- Meanwhile combine the sultanas with the chopped peel and chocolate chips. Stir in a teaspoon of flour to stop it clumping in the dough.
- Prepare the tin by lining with parchment paper. The paper should extend 5cm higher than the height of the tin.
- Punch down the risen dough again and turn onto a floured surface; sprinkle the fruit and chocolate mixture on top and work into the dough gently until evenly distributed.
- Shape the dough into a ball and gently drop into the prepared tin. Cut a cross into the top. Lay a sheet of clingfilm loosely over the top of the tin and leave for another hour or so until doubled in size again.
- Towards the end of the rising time, preheat the oven to 200c / 400f / gas 6. When ready to bake, melt 15g of the butter for finishing and brush it over the risen dough. Put a knob of butter in the centre of the cross.
- Bake for 10 minutes or until just starting to colour, then brush again with melted butter. Reduce the temperature to 180c / 350f / gas 4 and bake for a further 40 minutes until a good golden brown and a skewer inserted to the centre comes out clean. (My loaf was going very brown after 30 mins and I had to cover with foil to stop it burning).
- Remove from the oven and place the tin on a wire rack. Allow to cool for a few minutes before teasing it out of the tin. If your crust is fragile allow to cool further before removing from tin.
- Cool completely before slicing.
Notes


The use of the IKEA tin was inspired. I used a slightly different recipe (involved booze) but absolutely loved this challenge. The house was full of wonderful aromas for days. Thanks so much for hosting this month Sarah – brilliant idea.
Thanks Sally! Booze is definitely a good idea!
I nearly bought one of these in Lidl the other day, as I’ve never seen a recipe in a book and had presumed it was an impossible task. But now I will try this, thank you for sharing.
It’s time consuming but not difficult. Good luck!
Beautiful! Homemade panettone are better and cheaper thze the store-bought ones.
Cheers,
Rosa
What a lovely job you did. I don’t think I would have attempted making this, in all honesty, it seems really involved. I adore pannatone. My favourite way to eat is as toast with a little (or a lot ;)) of butter.
*kisses* HH
Most things are improved by butter!!
This is such a fantastic idea. I wish I’d thought of it!
The cutlery drainer you mean? It was a lightbulb moment!
Yours looks so tall and soft. I’m sure it tastes amazing. Pannettone always reminds me of xmas and I’d never have thought to make my own. I love your inventive use of the IKEA cutlery drainer!
Thanks!
never heard of this before, looks scrumptious!
Golly gosh, you’ve not had panettone? You must seek one out or make one this Christmas!
I make panettone every Christmas, ever since my Italian friend introduced me to it. I found this super easy recipe in Canadian living, that doesn’t take as much time, plus (shhh) I even tried making the dough in a bread machine, and it works perfectly.
I think it was for Forever Nigella that I made the Italian Baked Alaska and wrote about this cake. Its always been our favourite Christmas treat. Yours looks pretty awesome!!
I actually lined my tin with foil to make this (picture – http://www.flickr.com/photos/20117410@N02/5953465408/), but the Ikea tin is an inspired idea, and I am going to have to try this out.
Thanks for sharing Sarah 🙂
Mmmm! They look great!
How absolutely fantastic. I’ve been aching to make my own Panettone for Christmas for years, and the hours upon hours of rising somehow turned me off. Totally up for the challenge now, and as we have one of those IKEA cutlery holders (currently housing wooden spoons), I might just give that a try. Great suggestion!
This was a lovely challenge Sarah! We enjoyed every crumb of the panettone.
Oh brilliant, I just love it when you throw a few things together, don’t faff and it all turns out well in the end – despite what the recipe tells you – my sort of baking. Your panettone looks excellent – was going to try last year and didn’t manage it, see if I do this year.
Thank you so much for hosting this month. Our members seem to have enjoyed it. I’m only sorry I didn’t find time to try the recipe myself but it’s on my list of things to do in December if I get the time.
Wow Sarah!!! I’m italian and i can garantee this recipe is amazing! I’m going to have a Christmas dinner next weekend and i absolutely want to try this! Thank you… i miss my Italy and you reminds me how amazing is Panettone smell on Christmas morning… Well done! 🙂 Next time i will suggest you a secret italian recipe! 😀
Ok so decided to test out making this before christmas since popping my panattone cherry last chiristmas, and all I can say is yum yum yum. I used a regular loose base cake tin 18cm in diameter and 10cm high and his mixture filled it perfectly. The cake was just like the ones in the shop but so much better. Beautiful. Very simple. Ive never cooked anything like this before and it was simple and easy to follow. Many thanks for sharing the Recipie. Will defiantly be making some for the family this year. 🙂
I’m currently on step 6. No sign of any change in size for my lump of dough. Might be a RIP yeast moment. Oh dear 🙁
Oh dear! Happens to us all 🙁
How long can I keep it? Or is it best to eat it straight away? Really want it for Christmas eve as it is my sisters favourite and she is bringing her family for Christmas this year.
Like most breads, it’s best eaten fresh.
Yes it was easy. Was well received by guests who I tried it on.